

The term is a catchall for any handmade brew method where you’re actually pouring water over coffee grounds by hand and it is passing through the coffee before falling out into a server of some kind, all without the assistance of a machine. As you’ll see, a pour-over device can take many forms. But first–why?
Making coffee by hand certainly requires more work, but it has numerous advantages. Pour-overs give you the opportunity to totally dial in your brew by giving you more control over the variables. You can also make just the right amount of coffee so that it’s as fresh as possible and you make less waste.
What You'll Need To Make A Pour-Over Coffee

Pour-Over Devices
There are numerous pour-over devices. Common ones include Melitta, Kalita Wave, Hario V60, Bonmac, and Chemex. Other manual brewing methods–especially AeroPress and French Press—tend to be included in the pour-over discussion. They aren’t pour-overs, but they do have many of the same benefits.
So maybe we shouldn’t ask which method is best, but rather which method is best for you? The answer depends on what you hope to get out of your brew, both in terms of flavor and ease of use. We find that flat bottomed brewers like the Kalita Wave are the most user-friendly. They make it easy to achieve good results more consistently when compared to conical-shaped brewers like the V60 or Chemex. That said, the V60 and Chemex can produce coffee with a bit more flavor clarity. If you enjoy a heavier body and richer flavor, you might prefer an immersion brewer like a French Press or even split the difference with the Clever Dripper.
Our best advice is to try to use the brew method to enhance the flavor qualities of your coffee. Drinking a coffee that tastes like hot chocolate? Your best bet is choosing a brewer like the French press or Mellita that will produce a heavier body to pair with the rich flavors. Drinking a light, bright Ethiopian coffee that tastes like lemonade? Maybe use a method that highlights flavor clarity and lighter body, such as the Kalita, V60, or Chemex.

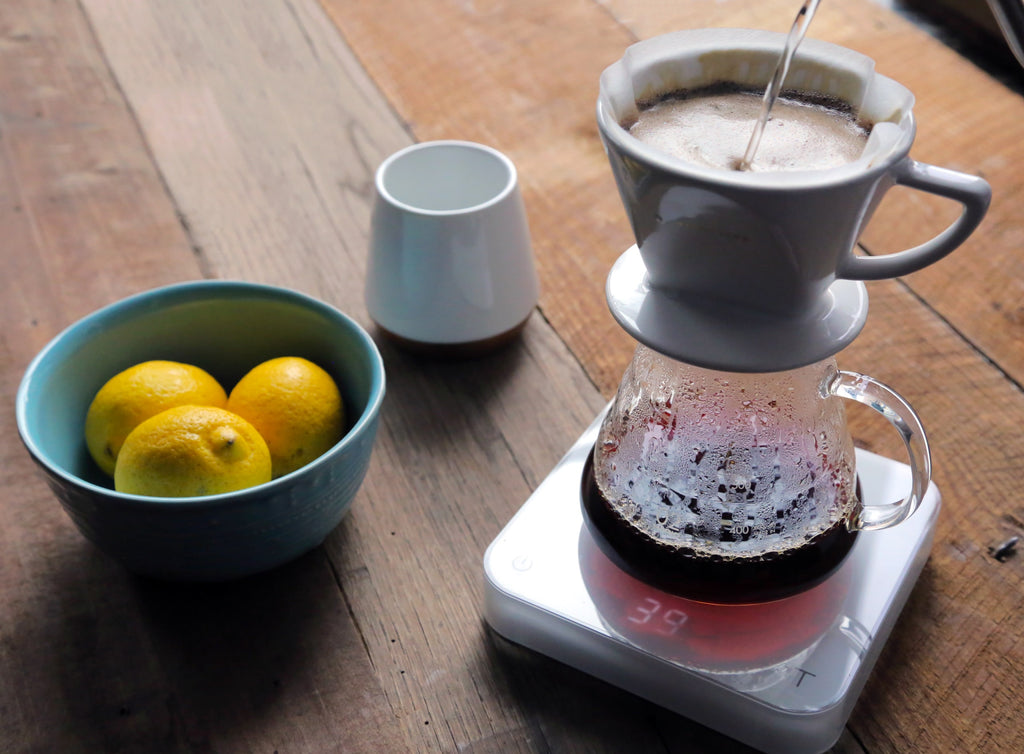
Kettles For A Pour-Over
With some brew methods, the speed and precision of your pour is less important and you can get away with using something as simple as a basic tea kettle or even a pot with a spout built into the rim. However, you will want to use a kettle with a gooseneck spout if you’re using any kind of pour-over device. This will allow you to control the flow of water and its direction much more precisely, and it will help you time your pour more accurately.
Water To Coffee Ratio
No matter what brew method you choose, you should always start with a good coffee-to-water ratio. We recommend somewhere between 1:14 and 1:20. That means that for every 1 gram of coffee you will want to use between 14 and 20 grams of water. If you prefer strong coffee, try starting around 1:14. If you like less-robust coffee, 1:20 might be your preference. We always like to start somewhere in the middle and then adjust to taste the next time after tasting our brew. With flat-bottom and conical brewers like the Kalita Wave or Hario V60, we recommend always starting around 1:17.
Steps To Making A Pour-Over

Step 1: Heat Your Water
Start boiling your water first so that it is ready by the time you finish weighing and grinding your coffee. Water is a variable you should generally keep consistent. We recommend brewing with freshly boiled water to ensure that your water temperature is the same every time. This also keeps the water temperature in the brewer as close as possible to the ideal range of 195-205 F for the longest time. The two exceptions to this rule are when we’re working with a dark roast, like Forty-Six, or a very floral and bright coffee, like Apollo. With those coffees, we advise starting with a lower brewing temperature to avoid over-extracting the dominant smoky or acidic flavors, which will throw off the balance.
Many pour-over recipes recommend starting with a cooler water temperature. We have a strong suspicion that this is because the coffees being brewed are darker or lighter roasts. With most of Counter Culture’s coffees, however, a full boil of your water will usually do the trick.

Step 2: Grind Your Coffee
Next, let’s talk about pour-over technique. You’ll want to start with fresh, whole bean coffee. Grinding your coffee right before you brew will help maintain the quality of your beans. We highly recommend using a quality burr grinder when you grind your coffee. It’s more consistent and will allow you to adjust the grind coarser or finer as needed for taste.
Should You Rinse The Filter For A Pour-Over?
To find out, do an experiment! Without using any coffee, pour hot water through the filter you usually use and then take a sip. If your water tastes papery, you should probably be rinsing your filter. If you don’t detect a papery flavor, you can skip this step.
When rinsing, be careful not to pour the water in a way that changes the shape of your filter. If you’re using a cupcake-style Kalita filter, don’t allow it to flop over or get sealed to the side of the brewer. This can disrupt the water flow later and impact the taste of your coffee. Chemex and V60 are popular pour-over methods that require the filter to be flattened against the walls of the brewing device. For those, pre-wetting is a necessary step.

Step 3: Brew Your Coffee
Add your ground coffee to the filter in your brewing device. Shake the coffee bed gently to level it out before pouring the water. This will allow the water to flow through all of the coffee more evenly.
Bloom The Grounds
No matter the method, you should start with a bloom. That means adding just enough water to let the coffee release the gasses still trapped inside from the roasting process. A great rule of thumb is to use roughly double the grams of water for the bloom as the amount of coffee. In other words, bloom with 60 grams of water if you’re starting with 30 grams of coffee. The goal is to saturate the entire coffee bed. Wait for the coffee bed to stop bubbling before you start your next pour.
Next, you should pour the remaining water in three to four roughly equally divided pulses with a spiraling pattern to make sure all of the coffee gets an even amount of water. If you are going to be pouring a total of 500 grams of water total, subtract your bloom water from 500 and then divide the remainder by four. This will give you the right amount of water to pour with each pulse. Just keep an eye on the coffee bed as you’re pouring–you don’t want it to overflow or go dry. Always try to keep the brewing device between ½ and ⅔ full of water.
If water normally passes through your brew very slowly, you may want to use a continuous pour. That means you don’t stop pouring water at any point after the bloom. We recommend this method for brewers like the V60 or Chemex, where either the coffee is ground very fine (V60) or the filter is very thick (Chemex). Both of those factors slow the flow of water, and a continuous pour will help keep the water moving.

Brew Time For A Pour-Over
The total brew time for a pour-over will depend on the brew method, but it will usually fall into the 3 to 4-minute range. Your chosen grind will determine which side of that range you’ll want to be on. If the grind is fine, like with the V60, you’ll want the brew time to be a little faster. If the grind is coarse, as with a Chemex, the brew time should be slower. Almost all of the other methods fall in the middle. When you miss your time target, it’s an indication that your grind isn’t quite right. For instance, a two-minute brew time means you need to make that grind finer to slow it down, and a five-minute brew time means you should probably go coarser.
We gave you plenty to “pour over,” but if you are interested in learning more, check out our classes! We teach classes virtually and in-person at a Counter Culture Training Center near you. Check out the dates and times for these classes and we hope to brew with you soon!


